Archive

2021-01-05 TIL

|

2021-01-05 TIL


  • 오늘 한 것
    1. 이것이 리눅스다 CentOS/Linux PXE 공부 - 킥스타트로 여러 대의 컴퓨터에 동시에 운영체제를 설치 할 수 있는 PXE에 대해 배웠다. USB,CDROM이 없는 컴퓨터라도 동일한 로컬 네트워크상에 있다면 이 기능으로 손쉽게 운영체제를 설치 할 수 있다.


    2. 학원 비대면 수업(15:30~22:00) 스레드 - 스레드스레드 항상 말만 들었지 드디어 스레드까지 배우는구나. 오늘은 대략적인 개념만 설명 듣고 멀티 스레드에 대한 핵심 내용은 내일 강의에서 이어진다.


    3. JavaFX 설치 및 이클립스 환경 세팅 - 실무에서는 안쓰이는 기능이지만 곧 다가올 개인 프로젝트에서 GUI로 구현한 무언가를 보여주기 위해 JavaFX 공부를 해야한다. JDK에 그냥 딸려있을 줄 알았는데 이거 설치하고 이클립스에서 환경 세팅하는데도 꽤나 애먹었다. scene Builder도 같이 활용하여 awt를 훨씬 능가하는 멋진 화면 구현을 해보이리다…


    4. Build 15 JavaScript Projects - 바닐라 JS를 조금 더 공부하고 리액트로 넘어가고 싶다는 생각에 여차여차해서 찾은 해외 교육 강의이다. 15가지 바닐라 JS로 구현 가능한 기능을 소개하고 있다. 며칠 투자해볼만할 가치가 있는것 같다.


    5. 블로그 포스팅 (Java Day Day 19,20 , CentOS PXE, JS Day 9) - 밀리지않도록 오늘 미친듯이 포스팅만 한듯..


  • 내일 할 것
    1. JavaFX 공부
    2. 학원 비대면 수업(15:30~22:00) 스레드
    3. 블로그 포스팅 (Java Day 23, Javascript Day 10, 투두리스트)
    4. Build 15 JavaScript Projects 수강


  • 끝으로

이것이 리눅스다 책을 드디어 뗐다. 책보고 실습하는 식이어서 중요한 내용들은 블로그에 바로바로 포스팅을 해뒀는데 나중에라도 보면 기억도 나고 무튼 올리길 잘했다고 생각이 든다.

오늘의 한 줄 총평 : 한 달에 책 한 권 떼기


CentOS8 PXE 설치

|

CentOS8 PXE 설치


이것이 리눅스다 의 Chapter19 PXE 설치의 실습내용입니다.


PXE (Preboot Execution Environment)란 여러 대의 컴퓨터에 운영체제를 설치 할 때 한 방에 해결해주는 인터페이스를 지칭한다.

DHCP 서버와 부팅파일을 전송할 TFTP서버, 운영체제 설치파일을 전송할 FTP서버로 구성된다.

server 컴퓨터로 접속하여 dnf 명령으로 dhcp-server, tftp-server, vsftpd 패키지를 설치하자.

원활한 실습을 위해 firewalld는 꺼두자.

먼저 DHCP 설정파일을 편집한다. vi 혹은 gedit으로 /etc/dhcp/dhcpd.conf 파일을 연다.

dhcp설정

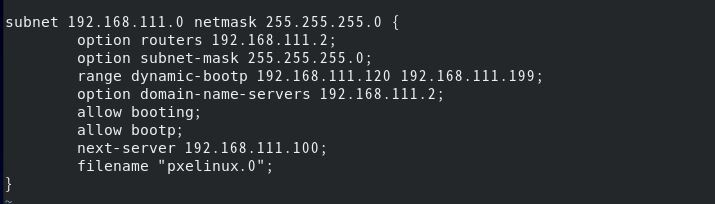
range 범위를 주어서 몇 십대의 컴퓨터 동시에 IP를 할당 받을 수 있다.

부팅과 부팅 프로토콜을 허용하고 부팅 파일이 있는 서버의 주소와 부팅파일 이름을 추가하였다.


이번엔 FTP 서버의 설정파일을 편집한다. /etc/vsftpd/vsftpd.conf 파일을 열고 Anonymous 사용자의 접속을 허용하게 해보자.

ftp설정


tftp는 따로 설정할 것이 없다.

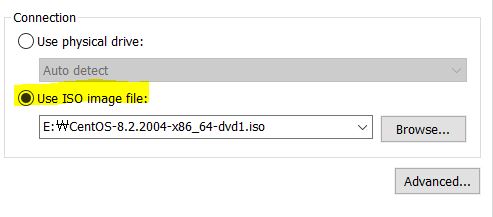
이제 centOS ISO 파일을 마운트하기 위해 VMware의 윈도우창에서 [Player] - [Removable Devices] - [CD/DVD] - [Setting]으로 ISO 파일을 연결한다.

ISO


/dev/cdrom의 mount를 잠시 umount로 끊고 /var/ftp/pub에다가 새로 마운트한다. dvd장치를 이용하면 여러 대의 컴퓨터가 접근시 속도가 느리므로 실전에서는 성능이 좋은 ssd 디렉토리에 iso 파일을 복사해놓고 시작하는 것이 좋다.

mount


부팅 파일을 준비하기 위해 다음 파일들을 /var/lib/tftpboot/ 디렉토리에 복사하자.

/var/ftp/pub/images 디렉토리의 vmlinuzinitrd.img

/var/ftp/pub/isolinux 디렉토리의 ldlinux.c32

/usr/share/syslinux 디렉토리의 pxelinux.0 (sysliux 디렉토리가 없다면 syslinux 패키지 설치)

잘 가져왔나 확인해보자.

복사


/var/lib/tftpboot 디렉토리에 별도로 pxelinux.cfg 디렉토리를 만들고 default 설정 파일을 생성하자.

default 파일을 열어 다음과 같이 작성한다.

default

부팅 Label을 지정하고 Label이 시작되면 커널을 지정하고 CentOS 패키지 저장소를 지정한다.


dhcpd와 vsftpd, tftp를 재가동 시키고 상시가동으로 해놓는다.

직접 구축한 DHCP를 사용하려면 VMware에서 제공하는 DHCP 서비스를 중지해야한다.

VMware workstation pro의 Network Editor를 켜서 Vmnet8의 DHCP 서비스를 중지하자.


이제 실습을 위해 새로운 가상머신을 생성하는데 CD/DVD, USB가 없는 컴퓨터로 만들자.

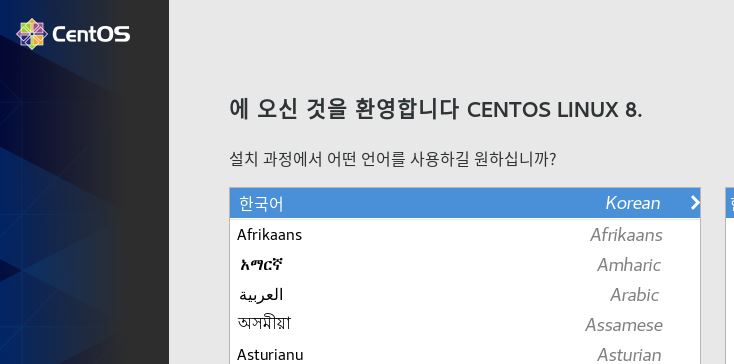
가상머신을 가동시키면 자동으로 TFTP에 접속해 파일을 다운로드한다.

조금 더 기다리면 설치화면이 아주 잘 나온다.

설치화면


하지만 설정, 디스크 파티션 설정 등등은 일일이 해주어야하는데 그게 100대의 컴퓨터라면?

그 문제점을 해결해주는 것이 바로 ‘킥스타트’ 이다.

부팅 후 필요한 작업들도 미치 설정할 수 있게 해주는 편리한 녀석이다.

다시 server 컴퓨터로 돌아가서 킥스타트를 구현하자.


/root/anaconda-ks.cfg는 CentOS 설치시 설정한 정보가 담겨있다. 이 파일을 /var/ftp/centos.ks 파일로 복사하자.

편집기로 centos.ks 파일을 열고 다음과 같이 수정한다.

centos.ks

url을 걸어주고 cdrom 설치를 주석처리한다.

centos.ks2

설치할 패키지를 지정하는데 @^환경그룹명, @그룹명, 패키지명 순으로 지정한다.


centos.ks 의 mod를 644로 바꾸어 외부에서 읽을 수 있게 한다.

마지막으로 /var/lib/tftpboot/pxelinux.cfg 디렉토리에 만든 default 설정파일을 열고 마지막 행의 맨 뒤에 킥스타트 설정파일인 centos.ks 를 연결해주자.

ks연결


다시 새로운 가상머신을 작동시켜서 설치가 진행되는지 확인해보자.

주의할점은 server 컴퓨터의 설치 설정을 그대로 가져왔으므로 하드디스크의 용량을 똑같이 80Gb, SCSI로 설정해주어야한다는 것.

컴퓨터를 부팅시키면 server에서 설정한 root 비밀번호와 사용자명까지 그대로 설치가 자동으로 진행되는 것을 볼 수 있다.

끝.


참고자료


이것이 리눅스다 Chepter 19 PXE 설치

JS Day 9 맵(map)과 셋(set)

|

JS Day 9 맵(map)과 셋(set)


  1. 맵(Map)

    • key, value 값을 저장한다는 점에서 객체와 유사하지만 key에 다양한 자료형을 허용.
    /*
    *	new Map()으로 생성
    *	map.set(key,value) - key에 value값 저장
    *	map.get(key) - key에 해당하는 value값 반환, 없으면 undefined 반환
    *	map.has(key) - key가 존재하면 true, 없으면 false
    * 	map.delete(key) - key에 해당하는 값 삭제
    *	map.clear() - 맵 초기화
    * 	map.size - 요소의 개수 반환
    */
       
    let map = new Map();
    // map.set의 체이닝
    map.set(1, 'age') // 숫자형 key
      .set(true, 'isAlive') // boolean형 key
      .set('age', 12); // 문자형 key
       
    map.has(1); // true
    map.get(true); // isAlive
    map.size; // 2


    • map은 객체형 key값도 가질 수 있다.
    let fox = { name: 'fox', age: 12 };
    let isAlive = new Map();
    isAlive.set(fox, false);
    console.log(isAlive.get(fox)); // false


    • map의 요소 순회하기 (for .. of 반복문)
    /*
    *	map.keys() - key를 모은 iterable 객체 반환
    *	map.values() - value를 모은 iterable 객체 반환
    *	map.entries() - [key,value] 한 쌍으로 iterable 객체 반환
    */
       
    let zoo = new Map([
        ['fox', 12],
        ['mouse', 5],
        ['horse', 10]
    ]);
       
    for(let animal of zoo.keys()){
        console.log(animal);
    } // fox, mouse, horse
       
    for(let age of zoo.values()){
        console.log(age);
    } // 12, 5, 10
       
    zoo.entries();
    // {"fox" => 12, "mouse" => 5, "horse" => 10}


  2. 셋(Set)

    • set은 중복을 허용하지 않음.
    • set에는 value값만 저장된다.
    /*
    *	new Set()로 생성
    *	set.add(value) - value 저장 후 자신을 반환
    *	set.delete(value) - value 제거, 성공하면 true, 아니면 false 반환
    *	set.has(value) - value가 존재하면 true, 아니면 false
    *	set.clear() - 셋 초기화
    *	set.size - 요소의 개수 반환
    */
       
    let set = new Set();
    let fox = { age: 3 };
    let mouse = { age: 10 };
    let horse = { age: 8 };
       
    //중복으로 add
    set.add(fox);
    set.add(mouse);
    set.add(fox);
    set.add(horse);
    set.add(horse);
       
    for(let animal of set){
        console.log(animal.age);
    } // 3, 10, 8


    • map과 마찬가지로 keys(), values(), entries() 메소드 사용 가능.


  3. 위크맵(WeakMap)

    • map의 key값으로 객체를 받았을때 key 값의 객체의 참조가 끊겨도 key는 가비지 컬렉터의 대상이 되지 않기에 그대로 남아있어 메모리 낭비가 된다.
    • WeakMap의 key 값으로 받은 객체의 참조가 끊기면 해당 객체는 메모리와 위크맵에서 삭제된다.
    • WeakMap의 key 값은 반드시 객체여야한다. 원시자료형 사용 x
    • keys(), values(), entries(), size 메소드 사용 불가.
    let fox = { age: 12 };
    let weakMap = new WeakMap();
    weakMap.set(fox, "2");
       
    fox = null; // 객체의 참조를 끊음
    // fox 객체는 메모리에서 삭제된다


  4. 위크셋(WeakSet)

    • 셋과 유사하지만 원시값 저장이 불가능하다. 객체만 저장 가능.
    • keys(), values(), entries(), size 메소드 사용 불가.
    let whoIsVisited = new WeakSet();
       
    let fox = { age: 12 };
    let mouse = { age: 8 };
    let horse = { age: 10 };
       
    //중복으로 add
    whoIsVisited.add(fox);
    whoIsVisited.add(mouse);
    whoIsVisited.add(mouse);
    whoIsVisited.add(fox);
       
    console.log(whoIsVisited.has(fox)); // true
    console.log(whoIsVisited.has(mouse)); // true
    console.log(whoIsVisited.has(horse)); // false
       
    horse = null;
    // horse 객체는 메모리와 위크셋에서 삭제된다


참고 자료


JAVASCRIPT.INFO

Java Day 22 CMS 완성

|

Java Day 22 CMS 완성


  • 들어가며

이제 기능적인 부분들을 구현하여 최종 완성을 한다. 기능은 완성본 사진으로 설명.


  • 완성본

등록

주민등록번호 유효성 검사로 올바른 주민등록번호 등록시 등록에 성공한다.

테스트를 위해 111111-1111011 테스트용 주민등록번호를 사용했다.


등록실패

유효성 검사에 통과하지 못하면 등록에 실패한다.


리스트

리스트의 항목을 누르면 해당 인물의 신상정보가 화면에 표시되고 이때 수정이 가능한 전화번호와 취미를 제외한 나머지 항목은 잠긴다. 마찬가지로 등록 버튼 이외의 버튼은 활성화가 된다.


분석

분석 버튼을 누르면 주민등록번호를 분석하여 관련 정보를 화면에 출력한다.


수정

수정 버튼을 누르면 전화번호와 취미를 수정할 수 있다. 다시 항목을 누르면 수정이 반영된 결과를 볼 수 있다.


삭제

삭제 버튼을 누르면 해당 인물의 객체가 삭제되고 리스트에서 사라진다. 이때 등록 버튼은 다시 활성화되고 나머지 버튼은 잠긴다. 텍스트필드도 초기화된다.


지우기

지우기 버튼은 객체는 삭제하지 않고 화면만 초기화한다. 입력모드로 바꾸는 버튼이다.


File 메뉴의 Save 메뉴 클릭시 파일을 저장 할 수 있으며 Save As는 다른 이름으로 저장이 가능하다.

New로 프로그램을 초기화한 뒤 불러오기를 하면 다시 화면에 출력이 가능하다.

불러오기


  • 소스코드
/*
	Freinds Class
*/
package lim.java.homework;

import java.io.Serializable;

public class Friends implements Serializable{
	//멤버필드
	private static final long serialVersionUID = 1L;
	private String name;
	private String birth;
	private String age;
	private String sex;
	private String address;
	private String tel;
	private Boolean[] hobby;
	private String id;
	//생성자
	public Friends(String id, String name, String birth, String age, String sex, String address, String tel, Boolean[] hobby) {
		this.name = name;
		this.birth = birth;
		this.age = age;
		this.sex = sex;
		this.address = address;
		this.tel = tel;
		this.hobby = hobby;
		this.id = id;
	}
    //메소드
	public String getTel() {
		return tel;
	}
	public void setTel(String tel) {
		this.tel = tel;
	}
	public Boolean[] getHobby() {
		return hobby;
	}
	public void setHobby(Boolean[] hobby) {
		this.hobby = hobby;
	}
	public String getName() {
		return name;
	}
	public void setName(String name) {
		this.name = name;
	}
	public String getBirth() {
		return birth;
	}
	public void setBirth(String birth) {
		this.birth = birth;
	}
	public String getAge() {
		return age;
	}
	public void setAge(String age) {
		this.age = age;
	}
	public String getSex() {
		return sex;
	}
	public void setSex(String sex) {
		this.sex = sex;
	}
	public String getAddress() {
		return address;
	}
	public void setAddress(String address) {
		this.address = address;
	}
	public String getId() {
		return id;
	}
	public void setId(String id) {
		this.id = id;
	}
}


/*
	Day 21 CMS - GUI편에 이어서 계속..
	FreindManager Class
*/

public void setEvent() {// 이벤트 걸기
    tf_frontId.addKeyListener(this);
    tf_backId.addKeyListener(this);
    choice_tel.addItemListener(this);
    list.addItemListener(this);
    for (int i = 0; i < btn_arr.length; i++) {
        btn_arr[i].addActionListener(this);
    }
    file_exit.addActionListener(this);
    help_ver.addActionListener(this);
    file_new.addActionListener(this);
    file_save.addActionListener(this);
    file_load.addActionListener(this);
    file_saveAs.addActionListener(this);
}

public void setMod() {// 버튼 활성/비활성
    for (int j = 0; j < btn_arr.length; j++) {
        if (j == 0) {
            btn_arr[j].setEnabled(!mod);
        } else {
            btn_arr[j].setEnabled(mod);
        }
    }
}

public void initForm() {// 화면 초기화
    tf_name.setText("");
    tf_frontId.setText("");
    tf_backId.setText("");
    tf_frontTel.setText("");
    tf_backTel.setText("");
    cb_group.setSelectedCheckbox(cb_male);
    for (int i = 0; i < hobby_arr.length; i++) {
        hobby_arr[i].setState(false);
    }
    choice_tel.select(0);
    choice_tel.select(0);
    tf_name.setEditable(true);
    tf_frontId.setEditable(true);
    tf_backId.setEditable(true);
    cb_male.setEnabled(true);
    cb_female.setEnabled(true);
    mod = false;
}

@Override
public void actionPerformed(ActionEvent e) {//Action
    for (int i = 0; i < btn_arr.length; i++) {
        if (e.getSource() == btn_arr[i]) {
            btn_selected = i;
            button_event();
        }
    }
    setMod();
    // 나가기
    if (e.getSource() == file_exit) {
        System.exit(0);
    }
    // 버전 정보
    if (e.getSource() == help_ver) {
        Point pt = getLocation();
        Dimension main_size = getSize();
        Dimension dial_size = d.getSize();
        d.setLocation((int) pt.getX() + main_size.width / 2 - dial_size.width / 2,
                      (int) pt.getY() + main_size.height / 2 - dial_size.height / 2);
        setDialog();
    }
    // 새 파일
    if (e.getSource() == file_new) {
        friend.clear();
        list.removeAll();
        myFile = null;
        mod = false;

    }
    // 저장하기
    if (e.getSource() == file_save) {
        if(myFile == null) {
            fileDialog = new FileDialog(this, "저장하기", FileDialog.SAVE);
            fileDialog.setVisible(true);

            String fileName = fileDialog.getFile();
            String directory = fileDialog.getDirectory();

            if(fileName == null || directory == null) {
                return;
            }

            myFile = new File(directory, fileName);	
        }
        saveObj();
    }
    // 불러오기
    if (e.getSource() == file_load) {
        fileDialog = new FileDialog(this, "불러오기", FileDialog.LOAD);
        fileDialog.setVisible(true);

        String fileName = fileDialog.getFile();
        String directory = fileDialog.getDirectory();

        if(fileName == null || directory == null) {
            return;
        }

        myFile = new File(directory, fileName);
        loadObj();
    }
    // 새 이름으로 저장하기
    if (e.getSource() == file_saveAs) {
        fileDialog = new FileDialog(this, "새 이름으로 저장하기", FileDialog.SAVE);
        fileDialog.setVisible(true);

        String fileName = fileDialog.getFile();
        String directory = fileDialog.getDirectory();

        if(fileName == null || directory == null) {
            return;
        }

        myFile = new File(directory, fileName);
        saveObj();
    }
}

public void saveObj() {//데이터 저장
    FileOutputStream fos = null;
    ObjectOutputStream oos = null;
    try {
        fos = new FileOutputStream(myFile);
        oos = new ObjectOutputStream(fos);

        for(int i=0; i<friend.size(); i++) {
            Friends myFriend = friend.get(i);
            oos.writeObject(myFriend);
        }
        ta_analysis.setText("\n\t성공적으로 저장되었습니다.");
    } catch(FileNotFoundException fnfe) {
        System.err.println(myFile.getName()+"파일이 존재하지 않습니다.");
    } catch(IOException ioe) {
        ioe.printStackTrace();
    } finally {
        try { if(oos != null) oos.close(); } catch(IOException ioe) {}
        try { if(fos != null) fos.close(); } catch(IOException ioe) {}
    }
}

public void loadObj() {//데이터 불러오기
    FileInputStream fis = null;
    ObjectInputStream ois = null;

    list.removeAll();
    friend.clear();

    try {
        fis = new FileInputStream(myFile);
        ois = new ObjectInputStream(fis);
        Friends myFriend = null;

        while((myFriend = (Friends)ois.readObject()) != null) {
            list.add(myFriend.getName());
            friend.add(myFriend);
        }
        ta_analysis.setText("\n\t성공적으로 불러왔습니다.");
    } catch(EOFException eofe) {
        ta_analysis.setText("데이터 로딩이 완료되었습니다.");
    } catch(FileNotFoundException e) {
        System.err.println(myFile.getName()+"파일이 존재하지 않습니다.");
    } catch(IOException ioe) {
        ioe.printStackTrace();
    } catch(ClassNotFoundException cnfe) {
        System.err.println("관리자에게 문의하세요.");
    }finally {
        try { if(ois != null) ois.close(); } catch(IOException ioe) {}
        try { if(fis != null) fis.close(); } catch(IOException ioe) {}
    }
}

public void make_info() {// 신상정보 구하기
    // 이름 구하기
    name = tf_name.getText();
    // 생년월일 구하기
    year = 1900;
    switch ((int) (id.charAt(6) - 48)) {
        case '3':
        case '4':
            year = 2000;
            break;
        case '9':
        case '0':
            year = 1800;
            break;
        default:
            year = 1900;
            break;
    }
    year += (int) (id.charAt(0) - 48) * 10 + (int) (id.charAt(1) - 48);
    int month = (int) (id.charAt(2) - 48) * 10 + (int) (id.charAt(3) - 48);
    int day = (int) (id.charAt(4) - 48) * 10 + (int) (id.charAt(5) - 48);
    birth = String.valueOf(year) + "년 " + String.valueOf(month) + "월 " + String.valueOf(day) + "일";
    // 성별 구하기
    sex = (int) (id.charAt(6) - 48) % 2 == 0 ? "여성" : "남성";
    // 나이 구하기
    age = String.valueOf(Calendar.getInstance().get(Calendar.YEAR) - year) + "세";
    // 출생 구하기
    String[] where = { "서울", "경기", "강원", "충북", "충남", "전북", "전남", "경북", "경남", "제주" };
    address = where[(int) (id.charAt(7) - 48)] + "지역";
}

public void button_event() {// 버튼 이벤트
    int index = list.getSelectedIndex();
    switch (btn_selected) {
        case 0:
            // 데이터 입력 안받고 등록 버튼 눌렀을때
            if (tf_name.getText().isEmpty() || tf_frontId.getText().isEmpty() || tf_backId.getText().isEmpty()
                || tf_frontTel.getText().isEmpty() || tf_backTel.getText().isEmpty()) {
                ta_analysis.setText("입력을 해주세요");
                return;
            } else {
                id = tf_frontId.getText() + tf_backId.getText();
                tel = choice_tel.getSelectedItem()+tf_frontTel.getText() + tf_backTel.getText();
                for (int i = 0; i < hobby_arr.length; i++) {
                    hobby[i] = hobby_arr[i].getState();
                }
                // 주민 유효성 검사
                int id_total = 0;
                int id_multi = 2;
                float temp = 0;
                double hap = 0;
                for (int i = 0; i < id.length() - 1; i++) {
                    id_total += ((int) (id.charAt(i) - 48) * id_multi);
                    id_multi++;
                    if (id_multi == 10)
                        id_multi = 2;
                }
                temp = 11.f * (int) (id_total / 11.f) + 11.f - id_total;
                hap = temp - 10.f * (int) (temp / 10.f);
                if (hap != (int) (id.charAt(id.length() - 1) - 48)) {
                    ta_analysis.setText("경고 : 올바르지 않은 주민등록번호입니다.");
                    return;
                }
                make_info();

                // 리스트에 추가
                list.add(name);
                ta_analysis.setText(name + "님이 성공적으로 등록되었습니다.");
                friend.add(new Friends(id, name, birth, age, sex, address, tel, hobby));

                initForm();
            }
            break;
        case 1:
            ta_analysis.setText("\n\t이름 : " + friend.get(index).getName() + "\n\t생년 : " + friend.get(index).getBirth()
                                + "\n\t나이 : " + friend.get(index).getAge() + "\n\t성별 : " + friend.get(index).getSex() + "\n\t출생 : "
                                + friend.get(index).getAddress());
            break;
        case 2:
            String newTel = choice_tel.getSelectedItem()+tf_frontTel.getText() + tf_backTel.getText();
            friend.get(index).setTel(newTel);
            Boolean[] newHobby = new Boolean[5];
            for (int i = 0; i < hobby_arr.length; i++) {
                newHobby[i] = hobby_arr[i].getState();
            }
            friend.get(index).setHobby(newHobby);
            ta_analysis.setText(friend.get(index).getName() + "님의 정보가 성공적으로 수정되었습니다.");
            break;
        case 3:
            ta_analysis.setText(friend.get(index).getName() + "님의 정보가 삭제되었습니다.");
            friend.remove(index);
            list.remove(index);

            initForm();
            break;
        case 4:
            initForm();
            ta_analysis.setText("");
            break;
    }
}

@Override
public void keyTyped(KeyEvent e) {}
@Override
public void keyPressed(KeyEvent e) {}
@Override
public void keyReleased(KeyEvent e) {
    if (e.getSource() == tf_frontId) {
        if (tf_frontId.getText().trim().length() == 6) {
            tf_backId.requestFocus();
            return;
        }
    } else if (e.getSource() == tf_backId) {
        if (tf_backId.getText().trim().length() == 7) {
            choice_tel.requestFocus();
            return;
        }
    }
}
@Override
public void itemStateChanged(ItemEvent e) {
    	//전화번호 통신사 선택시 다음 칸으로 focus
    if (e.getSource() == choice_tel) {
        tf_frontTel.requestFocus();
        return;
    }
    if (e.getSource() == list) {
        // 리스트 항목 클릭시 화면 표시
        tf_name.setEditable(false);
        tf_frontId.setEditable(false);
        tf_backId.setEditable(false);
        cb_male.setEnabled(false);
        cb_female.setEnabled(false);
        int index = list.getSelectedIndex();
        tf_name.setText(friend.get(index).getName());
        tf_frontId.setText(friend.get(index).getId().substring(0,6));
        tf_backId.setText(friend.get(index).getId().substring(6));
        choice_tel.select(friend.get(index).getTel().substring(0,3));
        tf_frontTel.setText(friend.get(index).getTel().substring(3,7));
        tf_backTel.setText(friend.get(index).getTel().substring(7));
        if (friend.get(index).getSex().equals("남성")) {
            cb_group.setSelectedCheckbox(cb_male);
        } else if (friend.get(index).getSex().equals("여성")) {
            cb_group.setSelectedCheckbox(cb_female);
        }
        if (e.getStateChange() == 1) {
            for (int i = 0; i < hobby_arr.length; i++) {
                hobby_arr[i].setState(friend.get(index).getHobby()[i]);
            }
        }
        // 버튼 활성화
        mod = true;
        setMod();
    }
}
public static void main(String[] args) {
    new FirendManager();
	}
}

setEvent() 메소드에 각 버튼들에 이벤트를 거는 기능을 구현했다.

주민번호 6자리를 입력하면 다음 칸으로 이동하며 뒷자리 7자리를 입력하면 전화번호 통신사 선택 choice로 focus가 이동된다.

등록 버튼과 다른 버튼들이 번갈아가면서 활성화되도록 boolean mod 변수를 선언하고 setMod() 메소드로 mod의 값이 바뀔때마다 버튼의 활성화가 바뀌는 기능을 구현했다.

for문으로 각 버튼을 순회하며 선택된 버튼값이 담길 변수에 값을 저장하고 이 변수로 switch문에서 해당 버튼의 기능들을 구현했다.

boolean 배열에 취미 checkbox의 선택된 항목을 저장하였다.

Object스트림으로 객체의 정보를 파일에 작성하고 읽어오는 기능을 구현했다.


소스코드 보기


마치며


학원에서 배운 내용들이지만 그 배운 내용들을 응용하여 스스로 무언가를 만들었다는 점이 뿌듯하게 느껴졌다. 이제 주제도 스스로 정하고 구조를 짜고 순서도를 작성하여 구현하는 연습을 해야겠다. 다음 java project 포스팅은 개인 프로젝트 때 일려나?


Java Day 21 CMS 구현 - GUI

|

Java Day 21 CMS 구현 - GUI


  • 들어가며

지난번 CMS는 GUI 없이 텍스트형태로만 작동하는 프로그램이었다면 이번엔 java awt로 GUI를 구현하여 조금 더 소프트웨어적인 형태를 띈 CMS를 구현했다. 정식 명칭은 FMS (Friend Manager System)이지만 간단한 프로그램이므로 쓰임에따라 얼마든지 CMS가 될 수도 있다.ㅋㅋ;;


  • 완성본

우선 완성본 레이아웃을 먼저 보자면

완성본


개인정보 입력란이 있고 [등록] 버튼을 누르면 전체 목록에 리스트가 올라간다. [분석] 과 기본적인 시스템상 메시지는 개인정보 분석의 text area에 출력된다.

[File]과 [Help] 두 메뉴가 있고 각각 하위 메뉴를 가진다.

File

Help


[Help]의 [Version] 클릭시 다이얼로그가 팝업되어 화면이 나타난다.

Version


  • 소스코드
package lim.java.homework;

import java.awt.*;
import java.awt.List;
import java.awt.event.*;
import java.io.*;
import java.util.*;

public class FirendManager extends Frame implements ActionListener, KeyListener, ItemListener {
	private Dialog d = new Dialog(this, "Friend Manager Version", false);
	private File myFile = null;
	private FileDialog fileDialog;
	private MenuBar mb = new MenuBar();
	private Menu menu_file = new Menu("File");
	private Menu menu_help = new Menu("Help");
	private MenuItem file_new = new MenuItem("New");
	private MenuItem file_save = new MenuItem("Save");
	private MenuItem file_load = new MenuItem("Load");
	private MenuItem file_saveAs = new MenuItem("Save as New name");
	private MenuItem file_exit = new MenuItem("Exit");
	private MenuItem help_ver = new MenuItem("Version");
	private Label empty1 = new Label("");
	private Label empty2 = new Label("");
	private Label empty3 = new Label("");
	private Label empty4 = new Label("");
	private Label title1 = new Label("전체 목록", Label.CENTER);
	private Label title2 = new Label("개 인 정 보 입 력", Label.CENTER);
	private Label title3 = new Label("개 인 정 보 분 석", Label.CENTER);
	private Label lb_name = new Label("이    름 : ", Label.RIGHT);
	private Label lb_id = new Label("주    민 : ", Label.RIGHT);
	private Label lb_tel = new Label("전    화 : ", Label.RIGHT);
	private Label lb_sex = new Label("성    별 : ", Label.RIGHT);
	private Label lb_hobby = new Label("취    미 : ", Label.RIGHT);
	private Label id_sep = new Label("-", Label.CENTER);
	private Label tel_sep1 = new Label("-", Label.CENTER);
	private Label tel_sep2 = new Label("-", Label.CENTER);
	private Label dial_text = new Label("Version 1.0", Label.CENTER);
	private TextField tf_name = new TextField(20);
	private TextField tf_frontId = new TextField(6);
	private TextField tf_backId = new TextField(7);
	private TextField tf_frontTel = new TextField(4);
	private TextField tf_backTel = new TextField(4);
	private List list = new List(45);
	private TextArea ta_analysis = new TextArea(30, 40);
	private CheckboxGroup cb_group = new CheckboxGroup();
	private Checkbox cb_male = new Checkbox("남성", cb_group, true);
	private Checkbox cb_female = new Checkbox("여성", cb_group, false);
	private Checkbox[] hobby_arr = new Checkbox[5];
	private String[] hobby_str = { "독서", "영화", "음악", "게임", "쇼핑" };
	private Choice choice_tel = new Choice();
	private Button[] btn_arr = new Button[5];
	private Button dial_ok = new Button("확인");
	private String[] btn_str = { "등록", "분석", "수정", "삭제", "지우기" };
	private boolean mod = false;
	private int btn_selected = 0;
	private ArrayList<Friends> friend = new ArrayList<>();
	private String name;
	private String age;
	private String sex;
	private String address;
	private String birth;
	private String id;
	private String tel;
	private Boolean[] hobby = new Boolean[5];
	public int year = 1900;

	public FirendManager() {// 생성자
		super("Friend Manager");
		setForm();
		setEvent();
		addWindowListener(new WindowAdapter() {// 종료 이벤트
			@Override
			public void windowClosing(WindowEvent e) {
				System.exit(0);
			}
		});
		setSize(500, 600);
		setResizable(false);
		setLocation(500, 180);
		setVisible(true);
	}

	public void setForm() {
		// 레이아웃
		setBackground(Color.LIGHT_GRAY);
		setLayout(new BorderLayout());
		add("West", empty1);
		add("East", empty2);
		add("South", empty3);
		add("North", empty4);
		Panel wrapper_upDown = new Panel(new GridLayout(2, 1));
		add("Center", wrapper_upDown);
		Panel wrapper_leftRight = new Panel(new BorderLayout());
		Panel content_analysis = new Panel(new BorderLayout());
		wrapper_upDown.add(wrapper_leftRight);
		wrapper_upDown.add(content_analysis);
		Panel content_input = new Panel(new BorderLayout(5, 10));
		Panel content_list = new Panel(new BorderLayout());
		wrapper_leftRight.add("Center", content_input);
		wrapper_leftRight.add("East", content_list);

		// 메뉴바
		setMenuBar(mb);
		mb.add(menu_file);
		mb.add(menu_help);
		menu_file.add(file_new);
		menu_file.addSeparator();
		menu_file.add(file_save);
		menu_file.add(file_load);
		menu_file.add(file_saveAs);
		menu_file.addSeparator();
		menu_file.add(file_exit);
		menu_help.add(help_ver);

		// 개인정보입력
		content_input.add("North", title2);

		// 개인정보 항목
		Panel ci_items = new Panel(new GridLayout(5, 1));
		ci_items.add(lb_name);
		ci_items.add(lb_id);
		ci_items.add(lb_tel);
		ci_items.add(lb_sex);
		ci_items.add(lb_hobby);
		content_input.add("West", ci_items);

		// 개인정보 이름 입력
		Panel ci_inputs = new Panel(new GridLayout(5, 1));
		Panel ci_input_name = new Panel(new FlowLayout(FlowLayout.LEFT));
		ci_input_name.add(tf_name);
		ci_inputs.add(ci_input_name);

		// 개인정보 주민 입력
		Panel ci_input_id = new Panel(new FlowLayout(FlowLayout.LEFT));
		ci_input_id.add(tf_frontId);
		ci_input_id.add(id_sep);
		ci_input_id.add(tf_backId);
		ci_inputs.add(ci_input_id);

		// 개인정보 전번 입력
		Panel ci_input_tel = new Panel(new FlowLayout(FlowLayout.LEFT));
		String[] tel = { "010", "011", "016", "017", "019" };
		for (int i = 0; i < tel.length; i++) {
			choice_tel.add(tel[i]);
		}
		ci_input_tel.add(choice_tel);
		ci_input_tel.add(tel_sep1);
		ci_input_tel.add(tf_frontTel);
		ci_input_tel.add(tel_sep2);
		ci_input_tel.add(tf_backTel);
		ci_inputs.add(ci_input_tel);

		// 개인정보 성별 입력
		Panel ci_input_sex = new Panel(new FlowLayout(FlowLayout.LEFT));
		ci_input_sex.add(cb_male);
		ci_input_sex.add(cb_female);
		ci_inputs.add(ci_input_sex);

		// 개인정보 취미 입력
		Panel ci_input_hobby = new Panel(new FlowLayout(FlowLayout.LEFT));
		for (int i = 0; i < hobby_arr.length; i++) {
			hobby_arr[i] = new Checkbox(hobby_str[i]);
			ci_input_hobby.add(hobby_arr[i]);
		}
		ci_inputs.add(ci_input_hobby);

		// 버튼
		Panel ci_input_btn = new Panel(new FlowLayout(FlowLayout.CENTER));
		for (int i = 0; i < btn_arr.length; i++) {
			btn_arr[i] = new Button(btn_str[i]);
			ci_input_btn.add(btn_arr[i]);
		}
		content_input.add("South", ci_input_btn);
		content_input.add("Center", ci_inputs);

		// 전체목록
		content_list.add("North", title1);
		content_list.add("Center", list);

		// 개인정보 분석
		content_analysis.add("North", title3);
		content_analysis.add("Center", ta_analysis);

		// 초기 버튼 비활성화
		setMod();
	}

	public void setDialog() {// 다이얼로그 레이아웃
		d.setLayout(new BorderLayout());
		d.setBackground(Color.LIGHT_GRAY);
		d.add("Center", dial_text);
		d.add("South", dial_ok);
		d.setSize(150, 150);
		d.setVisible(true);
		dial_ok.addActionListener(new ActionListener() {// 확인 클릭시 종료
			@Override
			public void actionPerformed(ActionEvent e) {
				d.dispose();
			}
		});
	}


setForm() 메소드를 정의하여 레이아웃을 구현하고 다이얼로그 역시 setDialog() 메소드로 구분지었다.

간단한 기능인 종료 버튼은 익명 클래스를 이용하여 구현했다.

전역변수에 대해 설명을 하자면 각각 신상정보는 String 변수에 담기게 될 것이다. 체크한 선택박스를 저장하기 위해 boolean 배열을 사용했다. 이 정보들을 가지게 될 각각의 객체를 담을 ArrayList를 준비했다.


소스코드 보기


마치며


swing과 javaFX 없이 순저히 awt만을 이용하였기에 괜시리 코드가 더 길어진듯하다.

나름 비슷한 항목끼리는 나눴지만 awt의 GUI는 정말 노답..